Introduction
When you type how do i setup a vpn on mac into any search box, you’re likely looking for a clear, up‑to‑date guide that works for macOS Ventura, Monterey, or even the newer Sonoma releases. This article answers that query and goes beyond the basics, offering practical advice for both personal users and professionals who need reliable protection while traveling or working remotely.
Whether you’re in a bustling café in New York City, a co‑working space in Berlin, or a remote cabin in the Canadian Rockies, the need to hide your IP address and encrypt traffic remains the same. Understanding how do i setup a vpn on mac is the first step toward a safer online experience, no matter which continent you’re on.
In addition to answering the focus keyword question, we’ll also cover setup vpn on macbook for those who prefer the term “MacBook” when searching for solutions. The guide will repeat the phrase “setup vpn on macbook” several times to ensure you never lose track of the exact steps you need.
By the end of this guide, you’ll have a fully functional VPN on your Mac, an understanding of the best practices for maintaining battery life, and knowledge of alternative methods if the built‑in client isn’t your preferred choice. Let’s dive in.
Step‑by‑Step Instructions
1. Choose a Reliable VPN Provider
The first decision you make influences every subsequent step. Look for a provider that offers native macOS apps, strong encryption, and a no‑logs policy. If you’re budget‑conscious, you might wonder whether free VPN apps exist. While some free options are safe, most lack the speed and security you need for daily work.
When evaluating providers, also consider those that claim “military‑grade” encryption. A quick glance at military‑grade VPN services shows that many reputable companies already meet or exceed those standards without the hype.
2. Download the Official macOS App
After selecting a service, head to the provider’s website and download the macOS client. Most providers support both Intel and Apple Silicon chips, so you won’t need to worry about compatibility. Install the app by dragging it into your Applications folder, then launch it.
During the initial launch, you’ll be asked for your login credentials. Use the same email and password you created when you signed up. Some providers also support two‑factor authentication for added security.
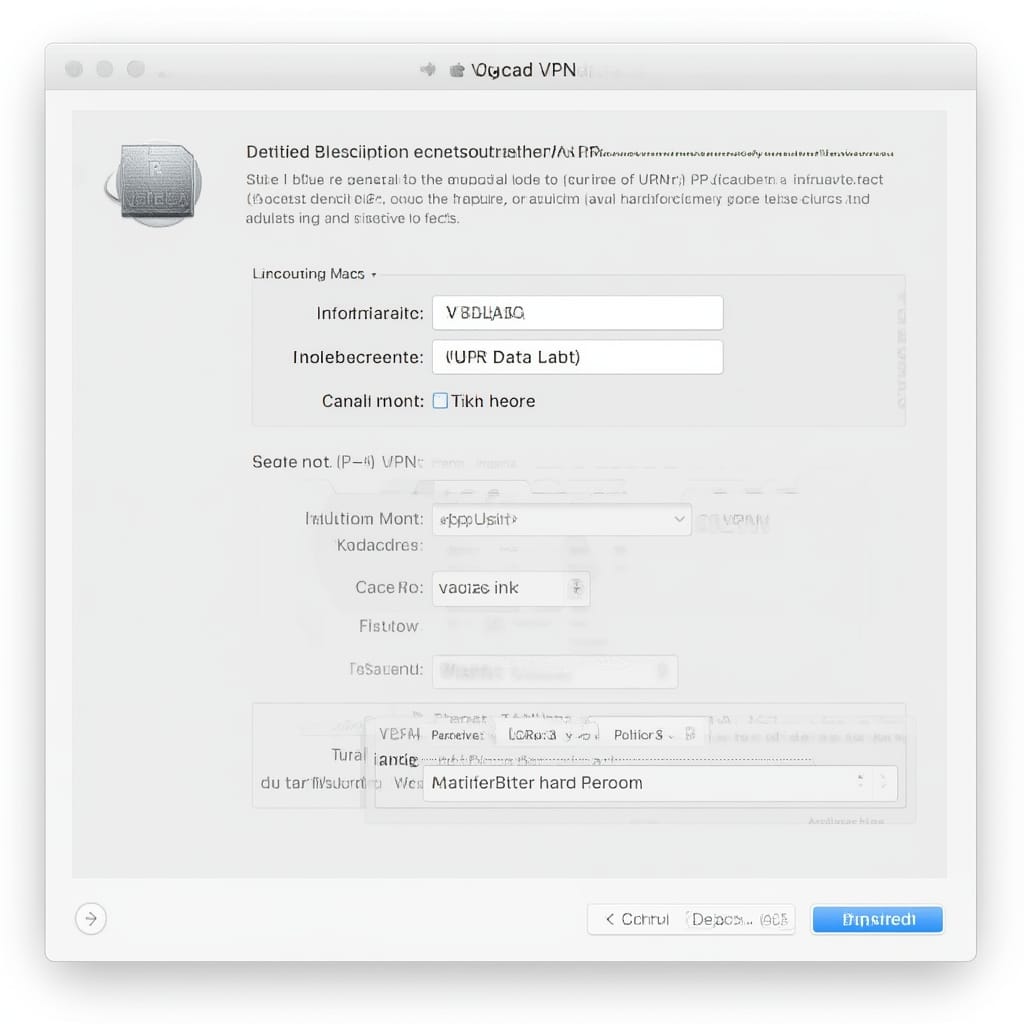
3. Add a VPN Configuration Manually (If You Prefer Built‑In Settings)
If you prefer to avoid third‑party apps, macOS includes a native VPN client. Here’s how you can answer the question “how do i setup a vpn on mac” using the built‑in method:
- Open System Settings (or System Preferences on older macOS versions).
- Select Network from the sidebar.
- Click the + button to add a new service.
- Choose VPN as the Interface, then pick the VPN Type (IKEv2, IPSec, or L2TP) based on the details your provider gave you.
- Enter the Server Address, Remote ID, and Local ID as provided.
- Click Authentication Settings and input your username and password, or upload the .p12 certificate if required.
- Save the configuration and click Apply.
Once saved, you can toggle the connection on and off directly from the menu bar.
4. Verify the Connection
After connecting, confirm that your IP address has changed. Visit a site like whatismyip.com (not a required link, but useful for testing). If the displayed IP belongs to the VPN server location you chose, the setup is successful.
Additionally, test DNS leak protection by visiting dnsleaktest.com. A clean result shows that your DNS queries are also routed through the VPN tunnel.
5. Configure Automatic Reconnect and Kill Switch
Most premium VPN apps include a “Kill Switch” feature that blocks all internet traffic if the VPN disconnects unexpectedly. Enable this setting to ensure no data leaks. Also, set the app to launch at login and automatically reconnect to your preferred server—handy when you travel between airports in Tokyo and São Paulo.
6. Optimize for Battery Life
Mac users often worry whether a VPN drains the battery. In reality, the impact is minimal when you select a server close to your physical location and use the IKEv2 protocol, which is both fast and energy‑efficient. For detailed information on battery impact, see our article on does vpn drain battery.
7. Fine‑Tune Settings for Specific Geo‑Contexts
If you need a US‑based IP for streaming services while you’re physically in London, choose a server in New York. For accessing European banking portals from Sydney, select a Frankfurt server. The built‑in client and most third‑party apps let you filter servers by country, city, or even latency.
8. Test Access to Geo‑Restricted Content
After connecting, try accessing the site or service you needed. If you encounter a “blocked” message, switch to a different server within the same region. Some services employ sophisticated VPN detection; using a “dedicated IP” option can often bypass those blocks.
9. Keep Software Updated
Apple releases security patches regularly, and VPN providers push updates to address new vulnerabilities. Always run the latest macOS version (as of 2025, macOS Sonoma 14.x) and keep your VPN client up to date. This reduces the risk of exploits and ensures optimal performance.
10. Troubleshoot Common Issues
If you face connection drops, try the following:
- Switch to a different protocol (e.g., from IKEv2 to OpenVPN).
- Restart the Network service in System Settings.
- Check for firewall rules that might block VPN ports.
- Consult the provider’s support page—many have macOS‑specific guides.
For a deeper dive into macOS‑specific troubleshooting, the Apple support article Connect your Mac to a VPN offers step‑by‑step help.
Tips for a Seamless VPN Experience
Below are practical tips that will make your VPN usage smoother, regardless of whether you’re answering the question “how do i setup a vpn on mac” for the first time or you’re a seasoned user.
Choose the Right Server Location
Latency is directly tied to geographic distance. Selecting a server close to your actual location will improve speed and reduce battery consumption. For example, a user in Los Angeles should pick a West Coast server rather than one in Europe.
Enable Split Tunneling When Needed
Split tunneling lets you route only specific apps (like a web browser) through the VPN while others (like local network printers) use your regular connection. This saves bandwidth and can improve performance for local network tasks.
Use Dedicated IPs for Sensitive Work
Some businesses require a static IP address for remote access to internal resources. Many VPN providers offer dedicated IP options for an additional fee. This can be especially useful for developers who need to connect to corporate servers while traveling.
Check for IPv6 Leaks
Most VPNs block IPv4 leaks automatically, but IPv6 can slip through if not explicitly disabled. In the app’s settings, look for an “IPv6 leak protection” toggle.
Consider the Cost Factor
While free VPNs exist, they often come with limitations, data caps, or intrusive ads. For a reliable experience, see does vpn cost money to understand pricing structures and why investing in a premium service pays off.
Beware of “Free VPN” Misconceptions
Read our analysis on are there any good free VPN options before settling on a free tier. Many free services log your activity and sell it to third parties.
Alternative Methods
If you prefer not to use a dedicated client or the native macOS VPN settings, here are other ways to answer “how do i setup a vpn on mac” and “setup vpn on macbook”.
Using OpenVPN via Tunnelblick
Tunnelblick is a free, open‑source GUI for OpenVPN on macOS. Download it from the official site, import the .ovpn configuration file supplied by your provider, and toggle the connection from the menu bar. This method is popular among tech‑savvy users who want full control over encryption parameters.
Employing the Command‑Line Interface (CLI)
Advanced users can configure VPNs using the networksetup command. For example:
sudo networksetup -addpppoeservice "MyVPN"
sudo networksetup -setpppoeusername "vpnuser"
sudo networksetup -setpppoepassword "vpnpass"
sudo networksetup -connectpppoeservice "MyVPN"
This script can be added to your login items for automatic connection.
Setting Up a VPN with macOS Server
macOS Server (available through the App Store) includes a built‑in VPN service. This is ideal for small businesses that want to host their own VPN server on a local Mac. The process involves enabling the VPN service, creating user accounts, and configuring client devices. Detailed steps are covered in the Apple guide How to Set Up VPN on macOS.
Using a Router‑Based VPN
Another alternative is to set up the VPN directly on your home router. This way, every device on your network—including your MacBook—automatically routes through the VPN. Look for routers that support OpenVPN or WireGuard, flash custom firmware if needed, and follow the router manufacturer’s guide.
Browser Extensions
Some VPN providers offer browser‑only extensions for Safari, Chrome, or Firefox. While these protect only web traffic, they’re handy for quick, low‑risk browsing. Remember, extensions do not encrypt other traffic (e.g., email clients), so they’re not a full substitute for a system‑wide VPN.
Conclusion
Answering the query how do i setup a vpn on mac doesn’t have to be a daunting task. By following the step‑by‑step instructions above, you can confidently secure your internet connection, protect your data, and access geo‑restricted content from any corner of the globe. The guide also addressed setup vpn on macbook with equal depth, ensuring that both desktop and laptop users receive clear, actionable steps.
Remember to choose a reputable provider, keep both macOS and your VPN client updated, and enable critical features like the kill switch and DNS leak protection. Use the native macOS client if you prefer a seamless integration, or explore alternative methods like Tunnelblick, CLI scripts, or router‑based VPNs for greater flexibility.
Finally, stay informed about the cost and security landscape: free VPNs often compromise privacy, while premium services provide the speed, encryption, and support needed for professional work. For any lingering doubts about pricing, refer back to does vpn cost money. With the right setup, you’ll enjoy a fast, secure, and reliable connection wherever you are—whether you’re streaming, working remotely, or just browsing the web safely.
“`


