Introduction
In today’s digital world, privacy is more critical than ever. For many users, the primary question is how to set vpn on android. Whether you’re traveling from New York to São Paulo or browsing from Mumbai to London, protecting your data from prying eyes is essential. This guide shows you exactly how to set vpn on android step-by-step, ensuring that your connection stays secure no matter where you are.
Setting up a VPN on Android isn’t just about security; it’s also about freedom. If you need to bypass regional restrictions or access work resources while abroad, you’ll quickly discover the importance of setup vpn on android device. Google’s built‑in VPN settings make this process smoother than ever before.
For millions of users in the EU, the EU General Data Protection Regulation (GDPR) makes it mandatory to safeguard personal information. Knowing how to set vpn on android can help you comply with these legal obligations while staying online. The steps below will guide you through each phase of the process.
When you’re a frequent traveler from Canada to Singapore or a remote worker in Australia accessing a corporate network, setup vpn on android device can be the difference between a smooth workflow and a frustrating disconnect. Let’s dive into the practical steps that will get you connected quickly and securely.
Finally, mastering how to set vpn on android is vital for anyone who wants to maintain privacy, avoid bandwidth throttling, or simply enjoy a more open internet. The following sections provide a comprehensive roadmap, from initial configuration to advanced tweaks tailored for users in the US, Brazil, and beyond.
Step‑by‑Step Instructions
1. Choose a Reliable VPN Provider
Before you start, pick a provider that supports Android and offers robust encryption. Popular options include NordVPN, ExpressVPN, and Surfshark. Each of these providers has a dedicated app for Android that simplifies the setup process. You can read a detailed review on how to use NordVPN for insights into performance, server coverage, and privacy policies.
2. Install the VPN App from the Google Play Store
Open the Play Store, search for your chosen VPN, and tap “Install.” Once downloaded, open the app and log in with your account credentials. Some VPNs will prompt you to grant permission for network access, which is essential for the VPN to route your traffic.
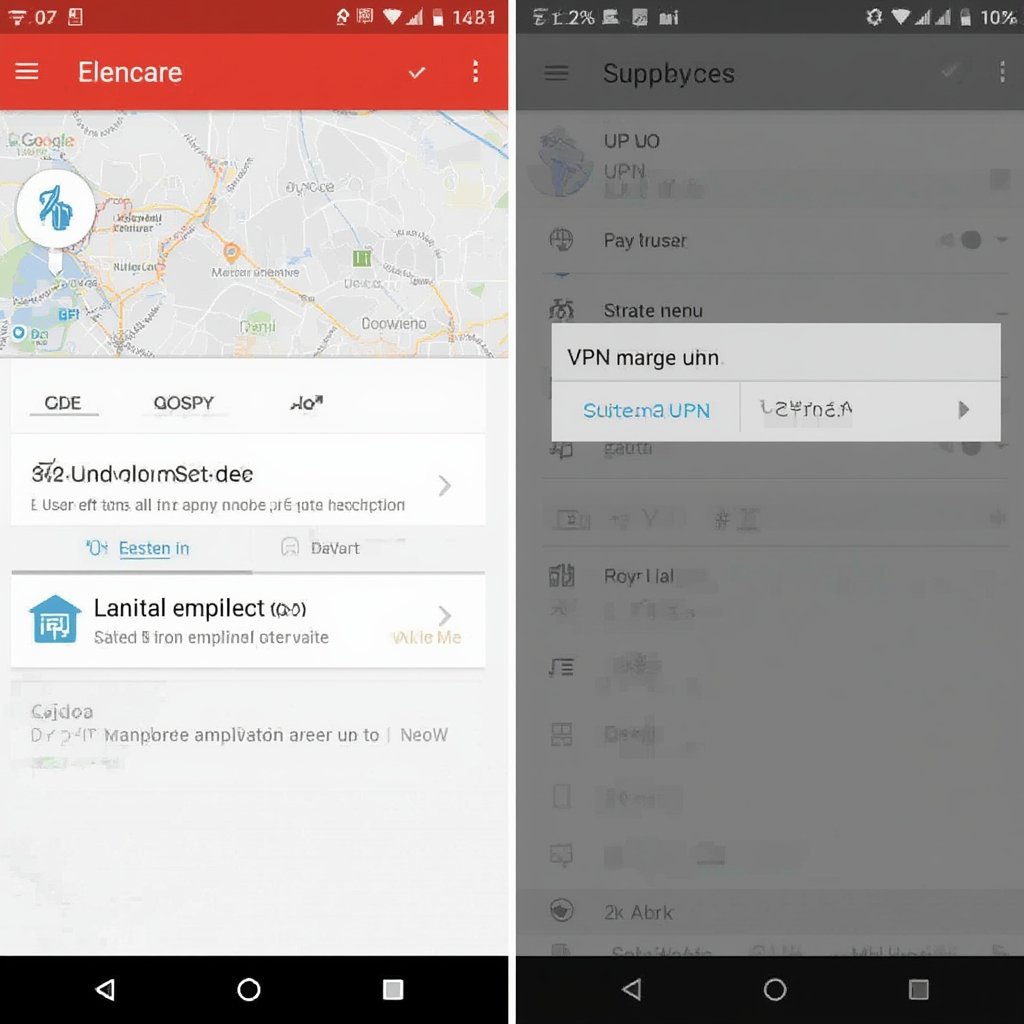
3. Enable VPN Connection in Android Settings
Navigate to Settings > Network & internet > VPN. Tap “Add” and enter the name you wish to display. From there, you can select the VPN type (usually IKEv2/IPSec with a pre‑shared key or L2TP/IPSec). After filling out the details, tap “Save.” Now your Android device has a VPN profile ready for use.
4. Connect to the VPN via the App
Return to the VPN app’s main screen and select a server location. Many apps display a map; choose a location based on your needs—such as a US server for accessing North American content or a German server for EU compliance. Tap “Connect” and wait for the status to change to “connected.” The VPN icon will appear in the notification bar, confirming an active secure tunnel.
5. Verify the VPN Connection
To confirm your IP address has changed, visit a site like https://www.whatismyip.com. Your IP should now reflect the server’s location. Additionally, check the “Network & internet > VPN” screen to see the active connection. If the VPN disconnects unexpectedly, explore the app’s settings for auto‑reconnect options.
6. Customize Security Settings
Within the app, enable features such as kill switch, split tunneling, or DNS leak protection. The kill switch ensures no data leaks if the VPN drops, while split tunneling allows you to choose which apps route through the VPN. These settings provide granular control over your traffic.
7. Test for Speed and Latency
Run a speed test within the VPN app or using an external service. A slight drop in speed is expected due to encryption, but reputable providers maintain high throughput. If you notice significant slowdowns, switch to a nearby server or enable the “auto‑select” feature.
8. Disconnect Safely
When you’re done, tap “Disconnect” in the app and then remove the VPN profile from Settings > Network & internet > VPN if you don’t plan to use it again. This ensures no residual profiles linger on your device, keeping your configuration clean.
Why Knowing how to set vpn on android Matters
Mastering the steps above not only shields you from local ISPs that might throttle traffic but also protects you in countries with restrictive internet policies, such as China or Iran. The knowledge of setup vpn on android device empowers you to choose the best server, maintain privacy, and comply with corporate security requirements worldwide.
Tips
Use a Strong, Unique Password for Your VPN Account
Creating a complex password reduces the risk of unauthorized access. Combine uppercase, lowercase, numbers, and symbols. Consider using a password manager for easy retrieval.
Enable Automatic Updates for the VPN App
Security patches and feature updates are delivered through app updates. Setting the app to auto‑update ensures you’re always protected against new threats.
Set Up a VPN Shortcut on Your Home Screen
Most VPN apps allow you to add a shortcut that toggles the connection on and off. This is convenient for quick switching while traveling.
Monitor Data Usage to Avoid Extra Costs
Android’s built‑in data usage monitor displays how much data passes through the VPN. Keep an eye on this to prevent exceeding your plan’s limits.
Explore Split Tunneling Options
Split tunneling lets you run certain apps (like a banking app) over the VPN while others (like a video streaming app) use the direct internet. This balances speed and security.
Remove VPN from an iPhone If Needed
Sometimes you may need to disconnect from a shared network or troubleshoot connectivity. Follow the steps at how to remove vpn from iphone to delete the profile without affecting other apps.
Alternative Methods
Configure a VPN Using a Custom Configuration File
If you prefer a manual approach, download the OpenVPN or IKEv2 configuration file from your provider. Go to Settings > Network & internet > VPN > Add, then choose “Import from file” and select the configuration. This method is handy for advanced users or when the app is unavailable.
Use a Proxy Server Instead of a Full VPN
For lighter usage, such as browsing, a proxy can mask your IP. However, proxies generally do not encrypt traffic, offering less privacy than a VPN.
Set Up a Windows VPN on a Laptop for Cross‑Device Sync
If you’re using a Windows 10 machine, follow the guide at how to setup windows vpn windows 10. This allows you to maintain the same VPN configuration across devices.
Leverage Built‑in Google VPN Features for Work
For business users, Google’s “Secure Work” VPN can be configured via the Google Work VPN setup. This method is tightly integrated with Google Workspace and offers advanced corporate controls.
Check If the VPN Uses More Data
Encryption can increase data usage slightly. Learn more about this at does a vpn use more data to understand how much overhead you might experience.
Read About VPNs on Android for Extra Tips
For additional best practices and real‑world usage scenarios, read the detailed article at NordVPN Blog – VPN on Android. It covers performance benchmarks and configuration nuances that can help you fine‑tune your experience.
Conclusion
Understanding how to set vpn on android is a crucial skill for protecting your privacy and ensuring reliable connectivity across the globe. Whether you’re in London, São Paulo, or Nairobi, the steps outlined here guarantee a secure and straightforward setup.
By mastering setup vpn on android device, you not only safeguard sensitive data but also gain the flexibility to access content, maintain compliance, and manage bandwidth efficiently. This knowledge empowers you to navigate the digital landscape confidently, no matter your location.
Remember, the security of your online activities hinges on the reliability of your VPN. Regularly update the app, monitor your data usage, and adjust settings such as the kill switch to stay protected. If you ever need to switch to a different VPN provider or add a new device, repeat the steps above to ensure seamless protection everywhere you go.
Stay safe, stay private, and enjoy the full potential of the internet—because with a properly configured VPN, you have the power to connect freely, securely, and confidently wherever you travel.


